
If you love Kit Kats but want a healthier, guilt-free version that still delivers the iconic crunch and chocolatey bliss, you’re in the right place. This Healthy Kit Kat Recipe is gluten free, vegan, and paleo-friendly, making it perfect for just about anyone looking for a clean-eating indulgence. Crispy, crunchy, and covered in silky dark chocolate, these homemade bars are proof that healthy desserts can be just as delicious as store-bought candy.
In this guide, you’ll get the full step-by-step recipe, pro tips for perfect texture, variations to suit your taste, storage advice, nutritional benefits, and even tips on making them look like they came straight from a gourmet chocolate shop. Whether you’re making them for yourself, your family, or for a holiday gathering, these bars will win hearts (and taste buds).
Why You’ll Love This Healthy Kit Kat Recipe
- Gluten Free & Vegan – Made without wheat, dairy, or eggs, so everyone can enjoy them.
- Paleo-Friendly – Grain-free flours and natural sweeteners keep them paleo-compliant.
- Better-for-You Ingredients – Coconut sugar, almond flour, and dark chocolate instead of refined sugars and additives.
- Customizable – Easy to swap in different nut butters, flours, or chocolates.
- No Special Equipment Needed – Just a baking sheet, parchment paper, and a bowl.
- Make-Ahead Friendly – Store in the fridge or freezer for quick treats any time.
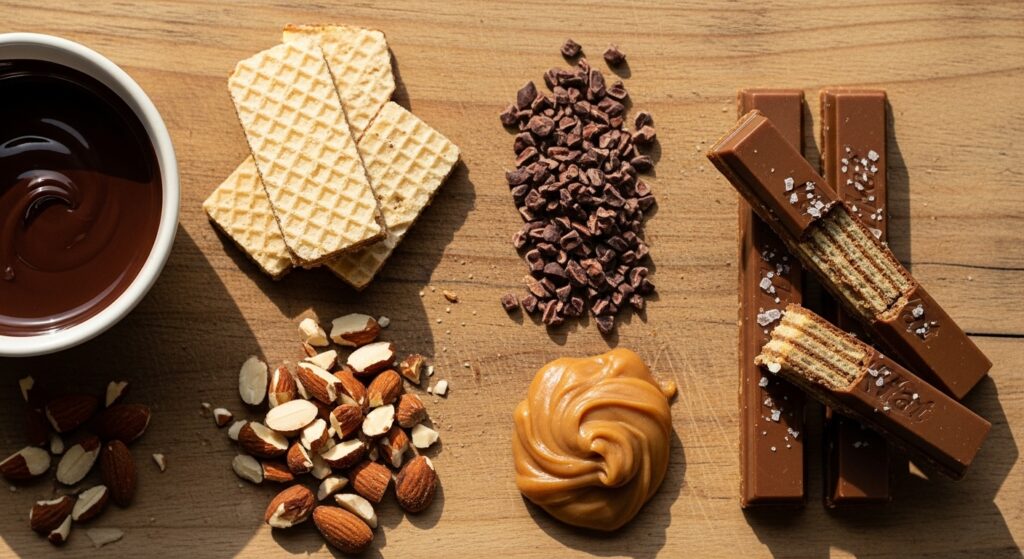
Ingredients You’ll Need
These wholesome ingredients work together to create a perfectly crunchy, chocolate-coated bar:
- 1 1/4 cup blanched almond flour (or tigernut flour) (115g)
- 3 Tbsp coconut sugar
- 1 Tbsp ground flax
- 1/8 tsp salt
- 3 Tbsp melted coconut oil
- 1 Tbsp water
- 1 tsp vanilla extract
- 2 Tbsp dark chocolate
- 3 Tbsp peanut butter (or Sunbutter for nut-free)
- 1 cup dark chocolate (5 oz)
- 1/2 Tbsp coconut oil
Step-by-Step Instructions
- Prepare the Oven: Preheat your oven to 350°F (175°C). Line a baking sheet with parchment paper.
- Mix Dry Ingredients: In a medium bowl, combine almond flour, coconut sugar, ground flax, and salt. Stir until well mixed.
- Add Wet Ingredients: Add melted coconut oil, water, and vanilla extract to the dry ingredients. Mix until a dough forms.
- Shape the Base: Roll or press the dough between two sheets of parchment paper until it’s about 1/4-inch thick. Cut into small rectangles to resemble Kit Kat sticks.
- Bake: Place the pieces on the prepared baking sheet and bake for 8 minutes or until golden. Let cool completely for maximum crunch.
- Make Peanut Butter Layer: Melt 2 Tbsp dark chocolate and stir in the peanut butter until smooth. Spread this mixture over the cooled wafers.
- Chill: Refrigerate for 15 minutes to set the peanut butter-chocolate layer.
- Coat in Chocolate: Melt 1 cup dark chocolate with 1/2 Tbsp coconut oil. Dip each bar until fully coated, letting the excess drip off.
- Set: Place the coated bars back on parchment paper and chill until the chocolate is firm.
- Enjoy: Your homemade healthy Kit Kats are ready to devour!
Tips for the Perfect Crunch
- Cool Completely: Let the wafers cool fully before adding the peanut butter and chocolate layers—this prevents sogginess.
- Use Fine Almond Flour: The finer the flour, the smoother and lighter your wafer texture will be.
- Don’t Overbake: Almond flour browns quickly, so keep an eye on your wafers in the oven.
- Use Good-Quality Chocolate: A 70% or higher cacao chocolate will give a richer, healthier taste.
- Work Quickly with Chocolate: Melt chocolate slowly over low heat to prevent seizing, and coat the bars quickly before it starts to firm up.
Healthy Ingredient Swaps
This recipe is already a healthy twist on the classic, but here are some variations and substitutions you can try:
- Nut-Free: Use Sunbutter instead of peanut butter and tigernut flour instead of almond flour.
- Keto-Friendly: Replace coconut sugar with a keto-approved sweetener like monk fruit or erythritol, and use sugar-free dark chocolate.
- Extra Protein: Mix a scoop of plant-based protein powder into the wafer dough for a post-workout treat.
- Flavor Boost: Add a dash of cinnamon or espresso powder to the chocolate coating for a gourmet twist.
- Festive Version: Sprinkle crushed freeze-dried raspberries or edible gold dust over the chocolate before it sets.
How to Make Them Look Store-Bought
If you want your homemade Kit Kats to look just as sleek as the ones in the candy aisle:
- Trim wafer edges with a sharp knife before coating to get clean lines.
- Use a dipping fork for smooth chocolate coating.
- Tap the coated bar gently against the bowl to remove excess chocolate.
- Chill on a wire rack instead of parchment for a perfectly even base.
Storage and Shelf Life
- Room Temperature: Store in an airtight container for up to 3 days (best if your kitchen is cool).
- Refrigerator: Keeps well for up to 2 weeks.
- Freezer: Store for up to 3 months. Thaw in the fridge before eating for best texture.
Serving Ideas
- Pair with a hot cup of coffee for an afternoon pick-me-up.
- Serve on a holiday dessert platter alongside other homemade treats.
- Wrap individually in wax paper and ribbon for a thoughtful edible gift.
- Chop into bite-sized pieces and sprinkle over vegan ice cream.
Nutritional Benefits
Unlike traditional candy bars, these healthy Kit Kats offer some surprising nutritional perks:
- Almond Flour: Rich in vitamin E, healthy fats, and protein.
- Coconut Sugar: Lower glycemic index compared to refined sugar.
- Dark Chocolate: Packed with antioxidants and minerals like magnesium.
- Peanut Butter: Adds protein and healthy fats for satiety.
Frequently Asked Questions
Can I make these without an oven?
Yes! You can shape the dough into thin rectangles and dehydrate them at low heat, or use a toaster oven. The texture will be slightly different but still delicious.
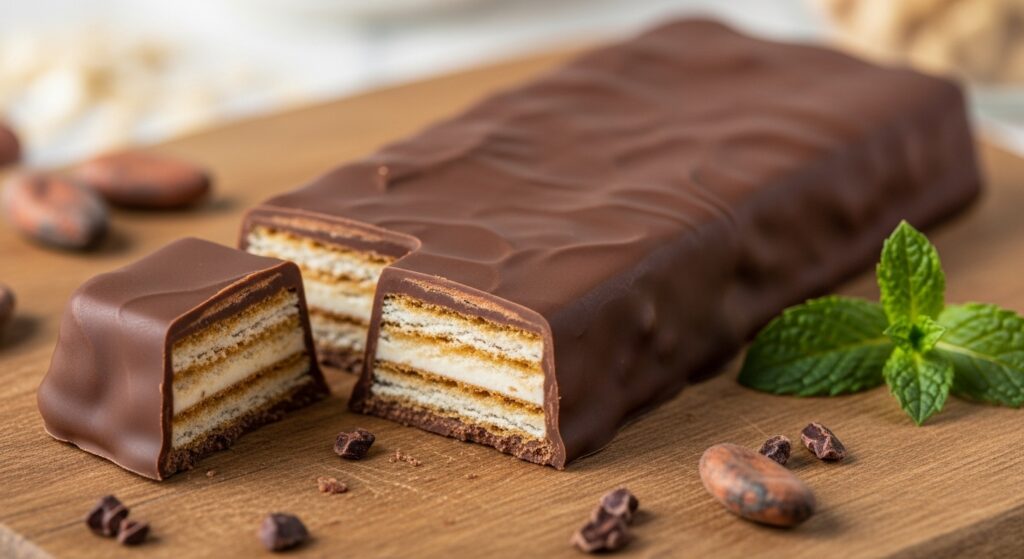
Do they really taste like Kit Kats?
Yes! The crisp wafer layer, peanut butter-chocolate combo, and the final chocolate coating come very close to the original—without the processed ingredients.
Can I double the recipe?
Absolutely. These store beautifully, so doubling the recipe is perfect for meal prepping treats.
What if my chocolate coating cracks?
This can happen if the bars are too cold before dipping. Let them sit at room temperature for a few minutes before coating.
Final Thoughts
With just a handful of wholesome ingredients and a bit of patience, you can create gluten free, vegan, and paleo Kit Kat bars that taste indulgent yet keep your health goals intact. Whether you’re avoiding refined sugar, catering to dietary restrictions, or just love a good DIY treat, this recipe proves you don’t have to sacrifice flavor for nutrition.
Go ahead—snap into one of these crispy, chocolatey bars and savor every bite. You may never go back to store-bought Kit Kats again.