
There’s something timeless and comforting about a warm cherry cobbler fresh out of the oven. With its sweet and tangy filling, golden-brown crust, and irresistible aroma, this classic dessert has won hearts for generations. Whether you’re looking to impress dinner guests, bring a dish to a family gathering, or simply treat yourself, this cherry cobbler recipe is your go-to for easy, mouthwatering results every time.
In this guide, you’ll learn everything you need to know about making the perfect cherry cobbler — from selecting the right cherries and assembling the ingredients, to serving, storing, and even customizing your cobbler for year-round enjoyment. Get ready to wow your taste buds and add a showstopping dessert to your repertoire!
Why Cherry Cobbler Is a Must-Try Dessert
When it comes to fruit-based desserts, few can rival the simplicity and flavor of a cherry cobbler. Here’s why it’s a must-try treat for home bakers and dessert lovers alike:
- Incredible Flavor: The tartness of cherries is perfectly balanced with sugar and warm spices, offering a taste that’s both vibrant and comforting.
- Easy Preparation: No fancy equipment or complicated techniques required. If you can mix and pour, you can make a cherry cobbler!
- Versatile Ingredients: Works with fresh, frozen, or even canned cherries, making it a year-round dessert option.
- Crowd-Pleaser: Great for potlucks, holidays, weeknight dinners, and special occasions.
- Customizable: You can add nuts, swap fruits, or change up the spices for different twists on the classic recipe.
What Makes Cherry Cobbler Special?
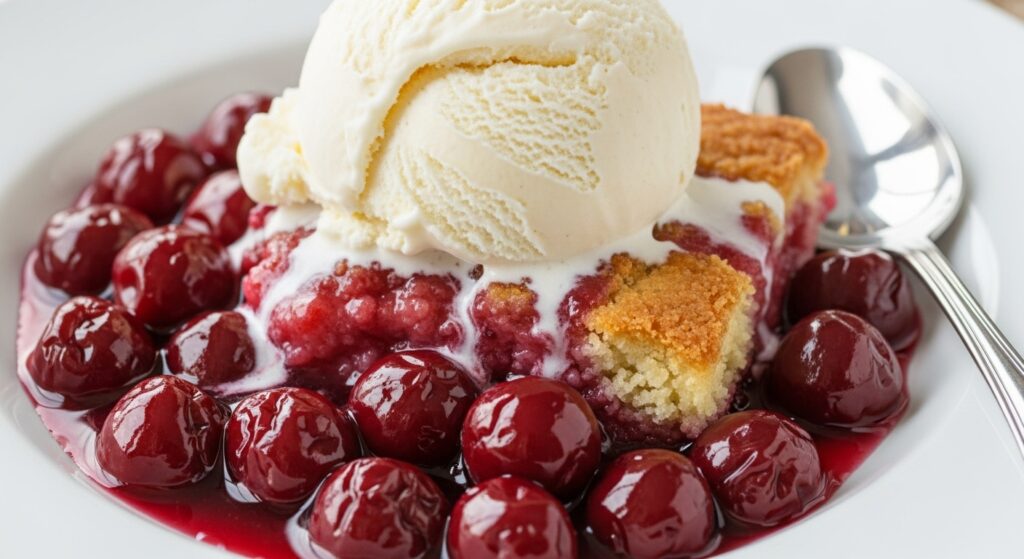
Cherry cobbler stands out in the world of fruit desserts because of its rustic charm and crave-worthy contrast in textures and flavors. The juicy, sweet-tart cherry filling bubbles up around a soft, cake-like topping that’s golden and slightly crisp on top. Serve it warm with a scoop of vanilla ice cream, and you’ve got a slice of dessert heaven.
Unlike pies, cobblers don’t require rolling out dough or complicated lattices. Unlike crisps or crumbles, there’s no need for oat or nut toppings (though you can add them if desired). It’s an honest, down-home dessert that delivers huge flavor with minimal effort.
Ingredients for Cherry Cobbler
To make this cherry cobbler, you’ll need simple pantry staples and delicious cherries. Here’s the complete list of ingredients:
For the Cherry Filling:
- 4 cups fresh or frozen cherries, pitted (about 1 1/2 pounds)
- 1/2 cup granulated sugar
- 1/4 cup brown sugar
- 1 tablespoon cornstarch
- 1 tablespoon lemon juice
- 1 teaspoon vanilla extract
- 1/2 teaspoon cinnamon (optional for extra flavor)
For the Cobbler Topping:
- 1 cup all-purpose flour
- 1 cup granulated sugar
- 1 teaspoon baking powder
- 1/4 teaspoon salt
- 1/2 cup unsalted butter, melted
- 1/2 cup milk
How to Make Cherry Cobbler: A Step-by-Step Guide
This cherry cobbler recipe is quick, easy, and foolproof. Just follow these six simple steps, and you’ll have a crowd-pleasing dessert ready in under an hour.
- Preheat the Oven Preheat your oven to 375°F (190°C). This gives you time to prepare the filling and topping while the oven gets hot.
- Prepare the Cherry Filling In a large mixing bowl, combine the cherries, granulated sugar, brown sugar, cornstarch, lemon juice, vanilla extract, and cinnamon (if using). Mix well until the cherries are evenly coated. Pour the cherry mixture into a greased 9×13-inch baking dish and spread evenly across the bottom.
- Make the Topping In a separate bowl, mix together the flour, granulated sugar, baking powder, and salt. Stir in the melted butter and milk until a thick batter forms.
- Assemble the Cobbler Drop spoonfuls of the batter over the cherry filling. Spread it slightly with the back of a spoon or spatula, but leave some gaps so the cherries can bubble up through the topping.
- Bake the Cobbler Place the baking dish in the preheated oven and bake for 35-40 minutes, or until the topping is golden brown and the cherry filling is bubbling.
- Cool and Serve Let the cobbler cool for about 10 minutes before serving. This allows the juices to thicken slightly and the flavors to settle. Serve warm with a scoop of vanilla ice cream or a dollop of whipped cream for an extra decadent treat.
Tips for the Best Cherry Cobbler
Here are a few expert tips to help you take your cherry cobbler from great to unforgettable:
- Use ripe, juicy cherries: Sweet cherries like Bing or Rainier are great, but tart cherries also add a pleasant zing.
- If using frozen cherries: Thaw and drain them before using to prevent excess moisture in the cobbler.
- Don’t overmix the topping: Stir just until combined to keep the batter tender.
- Add texture with nuts: Sprinkle chopped pecans or almonds over the batter for added crunch.
- Watch for bubbling: The cobbler is done when the filling bubbles through the topping and the crust is golden.
Serving and Storing Cherry Cobbler
How to Serve
Cherry cobbler is best served warm, right out of the oven. Pair it with:
- A scoop of vanilla or cherry ice cream
- Fresh whipped cream
- Crème fraîche or sweetened Greek yogurt
This dessert also tastes great at room temperature and can even be served chilled the next day.
Storing Leftovers
- Refrigerator: Store leftovers in an airtight container in the refrigerator for up to 4 days.
- Freezer: Cherry cobbler can be frozen for up to 2 months. Wrap tightly in foil or plastic wrap and freeze. Thaw in the refrigerator overnight and reheat in the oven at 350°F until warm.
- Reheating: Microwave individual portions or reheat in the oven to restore the crispness of the topping.
Variations and Twists
Looking to switch things up? Try one of these creative variations:
- Mixed Berry Cobbler: Use a combination of cherries, blueberries, raspberries, and blackberries.
- Chocolate Cherry Cobbler: Stir in chocolate chips to the cherry filling for a rich twist.
- Almond Cherry Cobbler: Add almond extract and sliced almonds for a nutty variation.
- Gluten-Free Cobbler: Substitute the flour with your favorite gluten-free flour blend.
- Mini Cobblers: Bake individual servings in ramekins for a cute, portion-controlled dessert.
FAQs About Cherry Cobbler
Can I use canned cherries?
Yes! Just be sure to drain them well and adjust the sugar depending on whether they’re packed in syrup or juice. Use tart cherries for a more traditional flavor.
What’s the difference between a cobbler and a crisp?
A cobbler has a thick, biscuit-like or cake-like topping, while a crisp has a crumbly topping made with oats and sometimes nuts. Both are delicious — it just depends on your texture preference.
Can I make cherry cobbler ahead of time?
Absolutely. Assemble the cobbler up to the baking step, then cover and refrigerate for up to 24 hours. When ready to bake, let it sit at room temperature for 15 minutes before placing it in the oven.
How do I keep my topping from becoming soggy?
Make sure to bake the cobbler until the topping is fully cooked and golden brown. Leaving some gaps in the batter when spreading it allows steam to escape and prevents sogginess.
What other fruits can I use in a cobbler?
Peaches, blueberries, apples, blackberries, and strawberries all work well. You can even mix different fruits for a seasonal variation.
Nutrition Facts
Here’s an approximate breakdown per serving (based on 10 servings):
- Calories: 280
- Fat: 9g
- Carbohydrates: 48g
- Sugar: 32g
- Fiber: 2g
- Protein: 2g
Conclusion: Time to Make Your Cherry Cobbler!
If you’re looking for a foolproof, crowd-pleasing dessert that’s as beautiful as it is delicious, this cherry cobbler recipe delivers. With just a handful of ingredients and minimal prep, you’ll have a warm, bubbling cobbler ready in under an hour — perfect for any occasion, big or small.
So grab those cherries and let your oven do the rest. Whether you’re serving it up at a summer cookout or enjoying a quiet night in, cherry cobbler is always a good idea.
Don’t forget to save this recipe to Pinterest and share it with friends and family who love easy, delicious desserts. Happy baking!